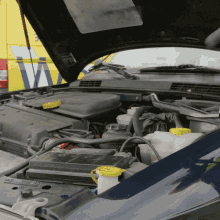
When you find yourself stranded with a dead car battery, knowing how to jump start a car using jumper cables can be a genuine lifesaver. It’s a skill every driver should have in their toolkit, especially considering how common battery issues can be, from leaving your lights on overnight to cold weather draining your battery’s power. Having the right tools and knowing the proper procedure can quickly get you back on the road. However, it’s essential to approach this task with caution.
Incorrectly using jumper cables can lead to severe damage to your vehicle’s electrical system, or worse, pose a risk to your safety. The jump-starting process requires connecting two car batteries, which means you are dealing with electricity. Even though the process might seem straightforward, improper handling of the cables can result in dangerous sparks, battery explosions, or electrical shocks. As a result, it is crucial to “follow the correct steps” and ensure safety measures are in place.
In this guide, we’ll walk you through everything you need to know to use jumper cables safely. From the signs of a dead battery to the correct cable connections, we’ll provide a step-by-step process that ensures you can jump-start your car without any issues. Whether you’re a seasoned driver or a beginner, learning how to use jumper cables is an invaluable skill that can save you time, money, and frustration.
When to Use Jumper Cables
Jumper cables are essential tools when your car’s battery becomes depleted. There are several key signs that indicate your battery may be dead or dying, and recognizing these symptoms can help you determine when it’s time to use jumper cables. By understanding these signals, you can avoid being stranded unexpectedly and act quickly to revive your car.

The most common symptoms of a dead car battery include:
- Difficulty starting the engine: If your car struggles to turn over when you turn the key in the ignition, this is a strong indicator that the battery lacks sufficient power.
- Dimming interior lights: When you attempt to start your car and notice the dashboard or interior lights dim significantly, the battery is likely too weak to power the vehicle.
- Weakened horn or turn signals: If the horn sounds faint or the turn signals blink slower than usual, this is another clear sign that your battery’s power is low.
- Unresponsive ignition: In the worst-case scenario, turning the key results in no reaction at all—no sounds, no lights—meaning the battery is fully dead.
These issues typically occur due to extended periods of inactivity, exposure to extreme weather (especially cold temperatures), or simply an aging battery that no longer holds a charge.
In cases where the battery is depleted, jumper cables can quickly provide the necessary power to start your vehicle. Jumper cables work by transferring electricity from a fully charged battery (often in another car) to the dead battery, giving it a temporary boost. As soon as you notice the signs mentioned above, it’s time to act—using jumper cables might be your best and quickest solution.
Key times when you need to use jumper cables include:
- When your car doesn’t start after several attempts.
- After leaving the lights, radio, or other electronic devices on while the engine is off.
- When the battery is old or hasn’t been replaced in several years.
- During extremely cold weather, which often reduces battery performance.
Jumper cables come in handy when your car shows symptoms of a weak or dead battery, and they are one of the most effective tools to get you back on the road. Knowing when to use them can save time, frustration, and potentially avoid needing a tow or professional assistance. Always make sure to carry a reliable set of jumper cables in your vehicle for such emergencies.
How to Use Jumper Cables: Step-by-Step Guide
Jump-starting a car with jumper cables is a straightforward process, but it requires careful attention to ensure safety and prevent damage. Follow these detailed steps to successfully and safely jump-start your car.
Step 1: Preparation
Before you begin, it’s essential to gather all the necessary tools and equipment. The most important items are:
- A second car with a working battery.
- A set of jumper cables (preferably heavy-duty ones with the right current capacity, often marked as AWG).
Safety is key at this stage. Always handle jumper cables by their insulated plastic grips to avoid the risk of electric shock. In addition:
- Wear protective gloves to shield your hands from accidental contact with any exposed wires or electrical components.
- Ensure both vehicles are turned off completely before attempting to connect the cables.
This preparation step not only helps you gather the right tools but also ensures your safety during the entire process.
Step 2: Positioning the Vehicles
Park both vehicles so that their engine compartments are close to one another but make sure they do not touch. This allows the cables to reach both batteries easily without causing a potential short circuit or electrical mishap.
Key things to remember:
- Leave enough space between the cars to comfortably work around the engine.
- Ensure both vehicles are securely parked with the parking brake on.
Proper vehicle positioning ensures a smooth connection and prevents unnecessary stretching or tangling of the jumper cables.
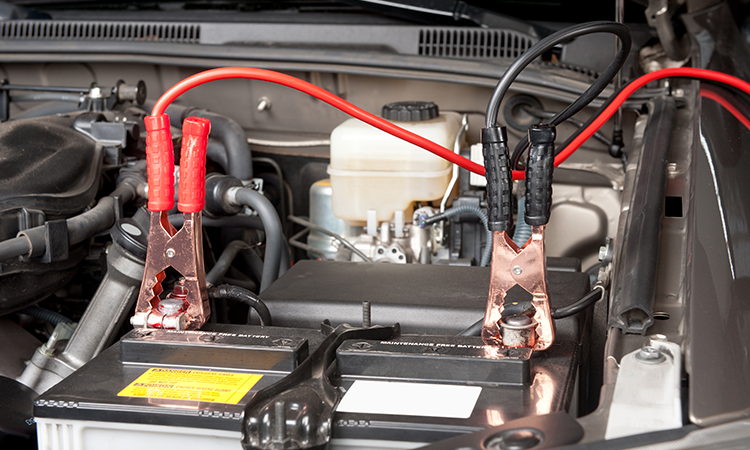
Step 3: Connecting the Jumper Cables
This step is crucial because incorrectly connecting the jumper cables can cause serious damage to your vehicle’s electrical system. Here’s the correct order for connecting the cables:
- Attach the red (positive) cable to the positive terminal on the donor car’s battery (the car with the working battery). The positive terminal is usually marked with a “+” symbol.
- Connect the other end of the red cable to the positive terminal of the dead battery (the car that needs a jump start).
- Attach the black (negative) cable to the negative terminal on the donor car’s battery.
- Connect the other end of the black cable to an unpainted metal part of the car with the dead battery, such as a bolt or bracket on the engine block. This serves as a grounding point and reduces the risk of sparks or battery damage.
Pro tip: Avoid connecting the black cable to the negative terminal of the dead battery as it can create a dangerous spark.
Step 4: Starting the Vehicles
Once all the cables are securely attached, it’s time to start the vehicles:
- First, start the engine of the donor car and let it run for a few minutes. This allows the working battery to charge the dead battery.
- After a few minutes, try starting the car with the dead battery. If it doesn’t start immediately, let the donor car run a little longer and then try again.
Patience is key in this step. Sometimes, it takes a few extra minutes for the battery to gain enough charge to start the car.
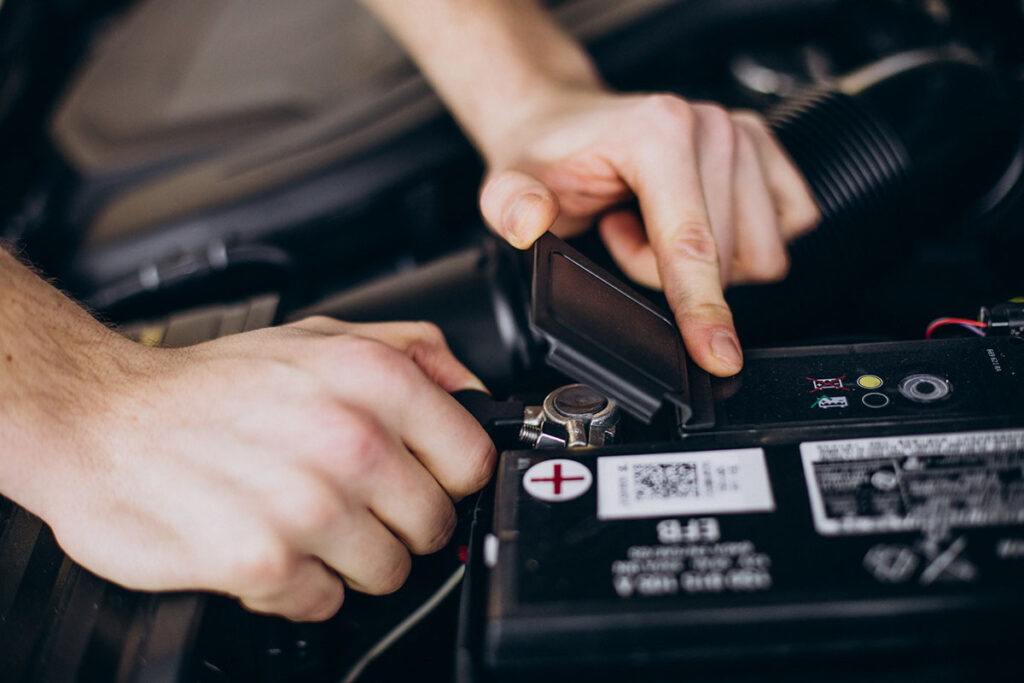
Step 5: Disconnecting the Cables
Once the car with the dead battery starts, it’s important to disconnect the jumper cables in the reverse order to prevent any damage:
- Remove the black cable from the grounded metal surface of the car that was jump-started.
- Disconnect the other end of the black cable from the donor car’s negative terminal.
- Remove the red cable from the positive terminal of the car that was jump-started.
- Disconnect the other end of the red cable from the donor car’s battery.
“Always remove the negative (black) cables first.” This prevents accidental short circuits and helps avoid damaging the electrical system of either vehicle.
After removing the cables, let the car with the newly started engine run for at least 15-20 minutes to recharge the battery.

By carefully following these steps, you can jump-start a car with jumper cables safely and efficiently. Always keep these steps in mind to avoid costly mistakes or hazardous situations when dealing with car batteries.
Jumper Cables Safety Tips
Using jumper cables is a straightforward process, but it’s crucial to follow safety protocols to avoid damaging your car or, worse, injuring yourself. Jump-starting involves handling high-voltage electricity, which can be hazardous if mishandled. Here are some essential safety tips to keep in mind.
First and foremost, always handle jumper cables by the insulated grips. The cables themselves carry significant electrical current, and direct contact with the metal parts can result in electric shock. It’s a simple yet vital precaution. Wearing protective gear like gloves and safety glasses is also highly recommended to shield yourself from accidental sparks or battery acid.
Avoid Incorrect Cable Connections
One of the most common mistakes when using jumper cables is connecting them in the wrong order. “Incorrectly connecting the cables can result in electrical damage to your vehicle’s systems”, or in extreme cases, lead to a short circuit that can damage both vehicles. Always follow this sequence:
- Attach the red (positive) cable to the positive terminal of the dead battery.
- Connect the other end of the red cable to the positive terminal of the working battery.
- Attach the black (negative) cable to the negative terminal of the donor vehicle.
- Finally, connect the other end of the black cable to a grounded metal part (not the battery) of the car with the dead battery.
Connecting the black cable to a metal part of the vehicle instead of the dead battery helps to prevent sparks, which can ignite any gases emitted from the battery, reducing the risk of explosion.
Ensure Vehicles Are Turned Off Before Connecting or Disconnecting
Always turn off both vehicles before attaching or detaching the jumper cables. This reduces the likelihood of electrical surges that could damage the car’s sensitive electronics. Once the connection is made, start the working car and allow the battery to charge for a few minutes before attempting to start the car with the dead battery.
After successfully jump-starting, disconnect the cables in reverse order:
- Remove the black cable from the metal ground.
- Disconnect the black cable from the working car’s negative terminal.
- Remove the red cable from the positive terminal of the now-jumped vehicle.
- Lastly, detach the red cable from the working car’s positive terminal.
Additional Precautions
- Never let the clamps touch each other. Once the cables are connected to the battery, the clamps carry electrical current. If they touch, it can cause sparks, potentially resulting in an electrical short.
- If the battery is cracked or leaking, do not attempt to jump-start the vehicle. This indicates severe damage, and the battery may explode if further stressed. It’s best to replace the battery entirely or consult a professional.
- Always consult your vehicle’s manual. Some modern cars have complex electrical systems, and jump-starting them improperly can damage these systems. Your manual may have specific instructions tailored to your car model.
By adhering to these safety guidelines, you not only reduce the risk of injury but also prevent costly damage to your vehicle. “Safety should always be your priority when dealing with electrical components in vehicles.” If in doubt, it’s better to call a professional for assistance.
Jumper Cables FAQ
When it comes to jump-starting a car, some common questions arise about the use of jumper cables and their effectiveness. In this section, we’ll address the most frequently asked questions to ensure you’re well-prepared when faced with a dead battery.
1. Can I Buy Jumper Cables at Gas Stations?
Yes, many gas stations sell jumper cables. However, the cables available at these locations are often lighter-duty, designed for smaller vehicles or emergency situations, and may not provide the best performance. While these might work for compact cars, they may not be sufficient for larger vehicles like SUVs or trucks.
- Recommendation: Consider investing in heavy-duty jumper cables with a lower gauge number (such as 4 AWG or lower) for more reliable performance, especially if you drive a larger vehicle or live in colder climates where jump-starting is more frequent. High-quality cables are built to handle higher current and will perform better in challenging conditions.
2. What Are Jumper Cables Used For?
Jumper cables, also referred to as jump leads or booster cables, are insulated wires with alligator clips at each end. Their primary use is to connect a car with a dead battery to a working battery in another vehicle. These cables enable the transfer of electrical power from the working battery to the dead one, providing enough charge to start the engine.
- Functionality:
- Connect a depleted battery to an external energy source.
- Allow energy transfer to jump-start the car.
- Help avoid being stranded due to a dead battery.
Jumper cables are a quick and efficient solution to get your car running again in an emergency.
3. Why Do I Need Heavy-Duty Jumper Cables?
Heavy-duty jumper cables are essential if you want to jump-start a car efficiently, especially in tough conditions or with larger vehicles. The key advantage of heavy-duty cables lies in their gauge—the thickness of the wire. The lower the gauge number, the thicker the cable, and the more current it can handle. This results in a faster, more effective jump-start.
- Benefits of Heavy-Duty Cables:
- Thicker wires (lower gauge) allow for better energy transfer.
- Work well in cold weather, where batteries often struggle.
- Suitable for larger vehicles like trucks, vans, or SUVs.
- Ensure a quicker and more reliable jump-start.
If you’re frequently driving in extreme weather conditions or own a larger vehicle, investing in high-quality, heavy-duty jumper cables is a wise choice.
4. Do I Need to Turn Off My Car Before Disconnecting the Jumper Cables?
Yes, it’s absolutely critical to turn off both vehicles before connecting or disconnecting the jumper cables. Failing to do so can result in serious damage to the electrical systems of either vehicle or even cause a dangerous electric shock.
- Key Points to Remember:
- Always ensure both cars are off before starting the jump-start process.
- Once the vehicle with the dead battery is running, turn off the donor car before disconnecting the cables.
- Disconnect the cables in reverse order to how they were connected (starting with the negative cable).
This simple step protects you and your vehicle from potential harm, making it an essential part of the jump-start procedure.
5. How Do I Connect Jumper Cables Properly?
Knowing how to connect the jumper cables properly is crucial for a successful jump-start. Here’s a simple step-by-step guide to ensure safe and correct connections:
- Ensure Both Cars Are Turned Off:
Before connecting the cables, double-check that both vehicles are off. - Connect the Red Clamp to the Positive Terminal of the Dead Battery:
Locate the positive terminal on the dead battery (usually marked with a “+” symbol) and securely attach the red clamp. - Attach the Other End of the Red Cable to the Positive Terminal of the Donor Battery:
Find the positive terminal on the working battery and attach the other end of the red cable to it. - Connect the Black Clamp to the Negative Terminal of the Donor Battery:
Next, connect the black clamp to the negative terminal (marked with a “-” symbol) on the working battery. - Attach the Other Black Clamp to an Unpainted Metal Part of the Dead Car:
Instead of connecting the black cable directly to the dead battery’s negative terminal, find a metal part of the car’s frame or engine block away from the battery. This acts as a ground and reduces the risk of a spark near the battery.
Following this step-by-step guide ensures a safe and effective jump-start, minimizing the risk of damage to either vehicle.
Following these steps will help ensure a safe, successful jump-start every time. Always remember that improper connections can lead to electrical damage or even personal injury, so it’s crucial to pay close attention to the sequence.
6. Can I Jump-Start My Car Alone?
In theory, you can jump-start a car by yourself if you have access to both a working vehicle and the necessary jumper cables. However, it is generally safer and more convenient to have assistance from another person during the process. Here’s why:
- Positioning the vehicles: It can be tricky to properly position two cars close enough for the jumper cables to reach, especially if the vehicles are parked in tight spaces.
- Monitoring both cars: Having an extra set of eyes allows for easier observation of both vehicles while ensuring the cables are connected safely.
- Avoiding mistakes: Having someone to double-check the connections or give a second opinion can help avoid missteps that could damage the vehicle’s battery or electrical system.
If no one is around, portable jump-starters or battery packs are an alternative to traditional jumper cables. These devices allow you to jump-start your vehicle without the need for a second car, and they are easy to store in your trunk for emergencies.
7. How Long Should I Let the Car Run After Jump-Starting?
Once your car has successfully started using jumper cables, it’s essential to let the engine run for a while to recharge the dead battery. Here are the general guidelines:
- Run the car for at least 15 to 30 minutes: This helps the alternator recharge the battery enough to restart the car on its own.
- Drive the car, if possible: Driving the car, rather than idling, will allow the alternator to charge the battery more effectively. A highway or longer drive will recharge the battery more quickly than city driving.
- Check battery status: If your car struggles to start again after running or driving, the battery may be too weak or damaged and might need replacement.
This practice helps ensure that the battery regains enough charge to function properly on its own the next time you need to start the vehicle.
8. What Should I Do If My Car Still Won’t Start After Jumping?
If your car refuses to start even after correctly following the jumper cable procedure, it may indicate a more severe issue than just a drained battery. Here’s what to check:
- Inspect battery connections: Ensure that the battery terminals are clean, and the clamps are secure. Corrosion on the terminals could prevent the battery from receiving a charge.
- Check the cables: Make sure the jumper cables are not damaged or worn out.
- Possible alternator or starter issue: If the car still doesn’t start, the problem could be with the alternator or starter. In this case, you may need to call for roadside assistance or consult a professional mechanic.
- Dead battery replacement: If the battery is old or has failed completely, no amount of jumping will help, and you’ll likely need a new one.
Taking these steps can help diagnose whether the issue lies solely with the battery or if there’s a deeper mechanical problem that requires professional intervention.
Knowing how to properly use jumper cables can make a world of difference in an emergency. By following the correct procedures and understanding the nuances of jump-starting, you can avoid the risks of electrical damage and ensure your car gets back on the road safely. Remember, jumper cables are a temporary fix to get you moving again, but regular battery maintenance or a professional check-up may be necessary if the problem persists.


Author: Frank Jenkins
Frank Jenkins – Family Car Expert and Safety Advocate
Frank Jenkins, steering you towards safer and smarter family driving. Based in: New York, New York, USA
About Me
Greetings from New York City! I’m Frank Jenkins, your navigator in the world of family vehicles and automotive safety. With over 15 years of experience as an automotive writer and safety consultant, I focus on what matters most to families on the go. Through rigorous testing and detailed research, I ensure that your next family car is not only comfortable and stylish but also packed with the latest safety features.
Contact Information
Topics of Interest
- Family-Friendly Car Reviews
- Vehicle Safety Systems
- Child Passenger Safety
- Road Trip Planning and Car Entertainment
Memberships
More About Frank
Short Bio: Frank Jenkins has become a household name for parents seeking advice on the best and safest cars for their families. His reviews are infused with a parent’s concern and an engineer’s precision. Education: Bachelor of Science in Automotive Technology from the New York University Qualifications: Certified Child Passenger Safety Technician (CPST) Languages: English (Native), French (Intermediate) Previous Roles:
- Safety Feature Columnist for Family Wheels Magazine
- Technical Advisor for Safe Car Campaigns
- Host of “The Safe Family Road Trip” Podcast
Fun Fact: Frank once organized a cross-country road safety workshop, visiting over 50 cities in 30 days.
Interactive Features
- Safety First with Frank: A forum dedicated to discussing and sharing best practices for family road safety.
- Frank’s Philosophy: “The best family memories are made in cars that put safety above everything else.”
- Your Stories: A section for readers to share their family road trip experiences and car-related anecdotes.
Featured Content
Newest Articles:
- “The Ultimate Guide to Family Cars in 2024”
- “Innovations in Car Safety: What Families Need to Know”
Highlighted Content:
- “Minivan or SUV: The Great Family Debate Resolved”
- “Child Seats 101: Choosing the Right One for Your Car”
Recommended Reads:
- “The Road to Safety: How Cars Have Become Safer for Children”
- “Entertaining Your Kids on the Road: Tips and Tricks”
Multimedia Spotlight:
- Podcast: “Drive Time Family” – Discussions on making family travel safer and more enjoyable
- Video Series: “Car Seat Clinics” – Demonstrations on proper car seat installation and usage
Editorial Team & Collaborations
Frequent Co-authors:
- Emily Chen, Urban Driving Specialist
- Marcus O’Reilly, Off-Road Adventure Guru
Editorial Staff Overview: A team of dedicated writers and safety experts committed to helping families make informed decisions about their vehicles. Editorial Guidelines: We are steadfast in providing transparent and practical advice that prioritizes the well-being of all passengers.
Journey With Me
For reliable reviews, safety advice, and the best in family automotive, hit the road with Frank Jenkins at oilforcar.com