When engine oil appears milky brown, it can signal a serious problem that requires immediate attention. This unusual coloration is not just a cosmetic issue; it indicates that coolant has contaminated the oil, potentially leading to severe engine damage if left unchecked. Understanding the causes and implications of milky brown engine oil is vital for any vehicle owner.
In this post, we will explore the various reasons why engine oil can turn milky brown, the dangers associated with this condition, and effective methods for diagnosis and repair. Additionally, we will provide practical tips on how to prevent milky oil formation, ensuring your engine remains in optimal condition. Whether you are a seasoned mechanic or a new car owner, this guide will equip you with the knowledge you need to keep your engine running smoothly.
By understanding the signs and symptoms of milky oil, you can make informed decisions about your vehicle’s maintenance. Ignoring these indicators can lead to costly repairs down the line. So, let’s dive deeper into the world of engine oil contamination and learn how to safeguard your vehicle’s health.
What is Milky Brown Engine Oil?
Milky brown engine oil is a concerning indicator of a potential problem within your vehicle’s engine. This unusual coloration often suggests contamination, typically due to the mixing of engine oil with coolant or moisture. When these substances combine, the oil takes on a thick, opaque appearance, resembling a milky substance, which can range in color from light brown to off-white.
The formation of milky oil is not merely a cosmetic issue; it signals serious underlying problems that need immediate attention. Normal engine oil should be a clear amber or dark brown, depending on its age and the vehicle’s usage. When it becomes milky, it compromises the oil’s ability to lubricate engine components effectively, potentially leading to severe engine damage.
Characteristics of Milky Brown Engine Oil:
- Thicker Consistency: The oil becomes noticeably thicker than regular oil.
- Color Variations: Ranges from milky white to light brown, often appearing cloudy.
- Visual Indicators: Milky deposits may also be visible on the dipstick, oil filler cap, or within the crankcase.
Understanding the implications of milky brown engine oil is crucial for vehicle maintenance. If you notice this change, it’s essential to investigate the cause promptly. Ignoring this warning can lead to more severe issues, including engine wear, overheating, and ultimately, catastrophic engine failure.
In summary, milky brown engine oil indicates a significant problem that requires immediate attention. Regular monitoring of engine oil appearance and consistency is vital for ensuring your vehicle operates smoothly and efficiently. If you find milky oil, take it as a serious signal to consult with a professional mechanic and diagnose the issue before it escalates.
Causes of Milky Brown Engine Oil
Milky brown engine oil is primarily the result of moisture contamination, which often indicates a serious underlying issue within the engine. Understanding the causes is crucial for effective diagnosis and prevention. Here are some of the most common contributors:
1. Faulty Head Gasket
The head gasket plays a vital role in sealing the combustion chamber. It separates the engine oil from the coolant, ensuring that these fluids do not mix. However, if the head gasket fails, coolant can seep into the oil system. This contamination leads to the formation of milky oil.
- Signs of a blown head gasket may include:
- Overheating engine
- Bubbles in the radiator
- White smoke from the exhaust
2. Sludge Buildup
When an engine is inactive for extended periods, sludge can accumulate in the crankcase. This sludge, a thick mixture of oil and contaminants, can combine with fresh oil once the engine is restarted. The result is often a milky or frothy appearance, indicating the presence of moisture.
- Sludge buildup can occur due to:
- Infrequent oil changes
- Poor quality oil
- Operating conditions that cause excessive heat
3. Humidity
In humid climates or during rapid weather changes, moisture can infiltrate the engine. High humidity levels can allow water vapor to enter through various engine components, such as oil seals and gaskets. When this moisture mixes with the oil, it creates the milky brown appearance characteristic of contaminated engine oil.
- Factors contributing to humidity-related oil contamination include:
- Poor ventilation in garages
- Frequent short trips that don’t allow the engine to reach optimal operating temperature
4. Other Potential Causes
In addition to the major contributors listed above, there are several other issues that can lead to milky engine oil. For instance, a failed transmission cooler can leak coolant into the engine oil, causing contamination. Cracked engine casings can also permit coolant intrusion, further exacerbating the problem.
- Additional causes include:
- Wear and tear on engine gaskets
- Improperly installed or damaged components
By understanding these causes, vehicle owners can take proactive steps to identify potential issues before they lead to severe engine damage. Regular maintenance and vigilant monitoring of oil condition can help prevent the formation of milky brown engine oil, ensuring the engine operates efficiently and reliably.
Dangers of Milky Oil
Milky brown engine oil is more than just an unsightly issue; it poses significant risks to your vehicle’s health. When coolant contaminates the engine oil, it creates a mixture that can severely impact the performance and longevity of your engine. The consequences of ignoring milky oil can be dire, leading to expensive repairs and even total engine failure.
- Corrosion is one of the most critical dangers associated with milky oil. The presence of moisture in the oil fosters rust, which can corrode vital engine components. Over time, this corrosion can lead to the deterioration of the engine block, bearings, and other parts, compromising the structural integrity of the engine. It’s not just an aesthetic concern; corrosion can significantly reduce your engine’s lifespan.
- clogged passageways. The thick consistency of milky oil can obstruct essential lubrication pathways. When oil cannot flow freely, engine components may not receive the necessary lubrication they need. This lack of lubrication can cause increased friction, leading to overheating and potential component failure. If parts begin to seize due to inadequate lubrication, the resulting damage could be catastrophic.
- The issue of diminished cooling cannot be overlooked either. Blockages from milky oil can trap heat within the engine. This trapped heat can lead to overheating, which places excessive stress on engine parts. As temperatures rise, the risk of critical components burning out increases, which can result in costly repairs or even total engine replacement.
- The poor lubrication resulting from high moisture content is detrimental to engine health. When oil becomes diluted, it loses its ability to lubricate effectively. This condition can lead to metal surfaces grinding against one another, generating tiny particles that clog passages. Over time, this grinding can wear down engine components and lead to premature failure.
Lastly, it’s essential to consider the increased operational costs that come with milky oil. Neglecting this issue can lead to a cycle of escalating repair costs. As engine components continuously degrade due to milky oil, you may find yourself facing a series of expensive repairs. Addressing the problem promptly can save you significant money in the long run.
In summary, milky oil is not a trivial matter. The dangers it poses—corrosion, clogged passageways, diminished cooling, poor lubrication, and increased operational costs—should not be underestimated. Regular monitoring of engine oil and immediate action upon noticing any changes can help safeguard your engine’s health. By being proactive, you can avoid the severe repercussions of milky brown engine oil and ensure your vehicle remains in optimal condition.
How to Diagnose and Fix Milky Oil
Diagnosing and fixing milky oil in your engine is essential to maintaining optimal vehicle performance. It can be a complex process, but with careful observation and systematic steps, you can identify the issue and take appropriate action. Here’s how to approach the diagnosis and resolution of milky oil contamination.
Step 1: Look for Symptoms
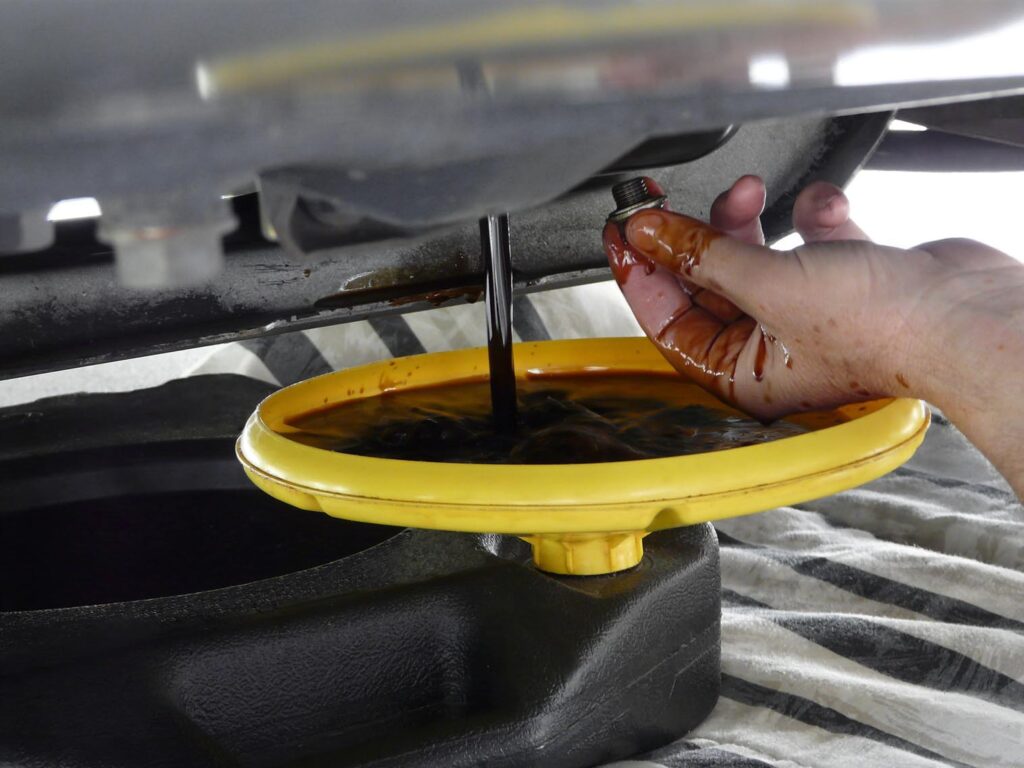
The first step in diagnosing milky oil is to check for visible signs of contamination. You can start by examining the engine oil dipstick and other areas where oil may be present. Look for any milky residue or discoloration, which indicates that moisture has mixed with the oil.
- Check the following:
- Dipstick: Look for a milky appearance.
- Oil Filler Cap: Inspect the underside for milky streaks.
- Crankcase: Check for milky droplets or sediment.
If you notice any of these signs, it’s crucial to act quickly to prevent further damage to your engine.
Step 2: Identify the Cause
Once you’ve identified that your engine oil is milky, the next step is to determine the underlying cause. This might require a more detailed inspection of the engine components. Some common issues that lead to milky oil include:
- Faulty Head Gasket: A head gasket that has failed can allow coolant to leak into the oil.
- Sludge Buildup: Engines that sit idle for long periods may develop sludge, which can mix with the oil upon restart.
- Coolant Leaks: Check for any visible leaks around hoses or engine seals that could be allowing coolant to enter the oil.
Identifying the source of the problem is critical for an effective solution.
Step 3: Fix the Issue
After determining the cause, it’s time to address the underlying problem. Depending on what you’ve discovered, this may involve several actions:
- Replace a Faulty Head Gasket: If this is the cause, it is crucial to replace it as soon as possible.
- Repair or Replace Damaged Hoses: If there are leaks, ensure that all hoses are intact and properly connected.
- Clear Sludge Buildup: If sludge is an issue, you may need to perform a thorough engine cleaning.
Addressing these issues promptly will help prevent further oil contamination and protect your engine’s longevity.
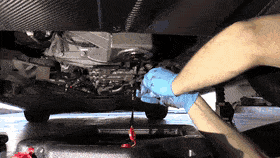
Step 4: Flush the Engine
Once the root cause has been fixed, flushing the engine is an essential next step. An engine flush can help remove remaining contaminants from the oil system. Use a high-quality engine cleaning solution, following the manufacturer’s instructions for the best results. This step will ensure that any residual milky oil is removed, making way for fresh, clean oil.
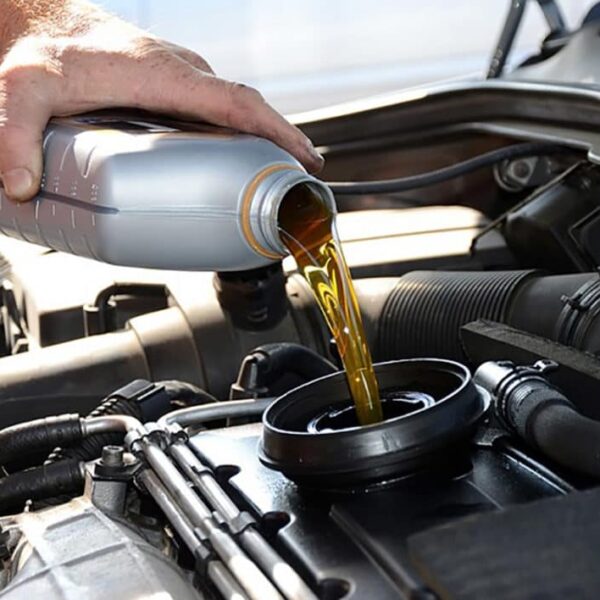
Step 5: Change the Oil and Filter
After flushing the engine, replacing the oil and filter is vital to ensure the engine is well-lubricated. Here’s what you should do:
- Drain the Old Oil: Make sure to remove all contaminated oil.
- Replace the Oil Filter: Installing a new filter is crucial for maintaining engine health.
- Add Fresh Oil: Fill the engine with the correct type and viscosity of oil as specified in the owner’s manual.
This step is critical, as it restores proper lubrication and protects the engine from future damage.
Diagnosing and fixing milky oil in your engine is a process that requires careful attention to detail. By systematically checking for symptoms, identifying the cause, fixing the underlying issues, flushing the engine, and changing the oil, you can safeguard your engine against the harmful effects of moisture contamination. Remember, if you are unsure or uncomfortable with any step, consulting a professional mechanic is always a wise choice. Early detection and prompt action are key to ensuring the longevity and performance of your vehicle.
Preventing Milky Oil Formation
Preventing milky oil formation in your engine requires proactive care and consistent maintenance. When engine oil becomes milky, it’s typically due to moisture mixing with the oil, which can lead to significant engine problems. By taking the right precautions, you can minimize the risk of moisture contamination and ensure that your engine runs smoothly for a longer time. Below are essential preventive steps you can take to avoid milky oil formation.
A. Importance of Regular Maintenance
Routine maintenance is the foundation of preventing engine oil issues. Regular check-ups allow you to identify potential problems, such as coolant leaks or worn gaskets, before they result in oil contamination. Proper maintenance helps to ensure that your engine operates efficiently, which also minimizes moisture buildup.
Key maintenance practices include:
- Checking oil levels and condition regularly.
- Inspecting engine components for leaks or wear.
- Following manufacturer recommendations for service intervals.
Neglecting regular maintenance can allow minor issues to grow into bigger problems, such as oil contamination or sludge buildup. This can lead to the formation of milky oil, putting your engine at risk of damage.
B. Key Preventive Measures
To further protect your engine from milky oil, certain actions should become part of your routine care. These preventive steps target the common causes of oil contamination and help to maintain the integrity of your engine.
1. Correct Engine Oil Usage
Using the correct oil type and viscosity for your engine is critical. Different engines require specific grades of oil to function efficiently, and using the wrong type can lead to inadequate lubrication or moisture retention. Always refer to your vehicle’s manual to select the appropriate oil.
- Oil Viscosity: Choose the recommended oil viscosity for your engine, especially in varying climates.
- Quality: Use high-quality oils with proper additives to prevent sludge and contamination.
2. Regular Oil Changes
Changing your engine oil at regular intervals is essential for preventing moisture buildup. Old oil can degrade over time and become more prone to absorbing water, especially if it’s not changed frequently. Following the manufacturer’s guidelines for oil changes will help maintain optimal engine performance and reduce the risk of milky oil.
- Oil change intervals: Stick to the recommended schedule, usually based on mileage or time.
- Oil filter: Replace the oil filter during each oil change to ensure clean oil circulation.
3. Avoiding Frequent Cold Starts
Cold starts, especially in humid or cold climates, can introduce condensation into the engine. When the engine is cold, moisture can accumulate, leading to milky oil formation. By reducing the number of cold starts, you can minimize the condensation that enters the oil.
- Garage storage: Keep your vehicle in a heated garage to reduce exposure to cold temperatures.
- Block heaters: Use block heaters in colder climates to pre-warm the engine before starting it.
4. Close Inspection of Hoses and Gaskets
Hoses and gaskets play an essential role in sealing the engine and preventing air or moisture from entering the system. Over time, these components may wear out, leading to leaks that allow moisture to mix with the engine oil. Regular inspection of hoses, seals, and gaskets can prevent this from happening.
- Signs of wear: Look for cracks, leaks, or looseness in hoses and gaskets.
- Leak prevention: Promptly replace any worn-out or damaged parts to avoid contamination.
By implementing these preventive measures, you can significantly reduce the likelihood of milky oil formation in your engine. Regular attention to oil quality, component condition, and proper usage habits will keep your engine running efficiently and help avoid costly repairs down the road.
FAQs about Milky Brown Engine Oil
What are the symptoms of a blown head gasket causing milky oil?
A blown head gasket is a serious issue that can lead to the formation of milky brown engine oil. When this critical seal fails, coolant can leak into the engine oil, creating a mixture that changes the oil’s appearance. Key symptoms to look out for include:
- Milky Oil: The most obvious sign is the oil’s color and consistency. If you notice a milky, creamy texture on the dipstick or oil filler cap, it’s a red flag.
- Engine Overheating: A blown head gasket often leads to engine overheating due to a compromised cooling system.
- White Smoke: If you see white smoke coming from the exhaust, it’s an indicator that coolant is burning in the combustion chamber.
- Bubbles in the Radiator: Bubbling or foaming in the radiator or overflow reservoir can suggest that combustion gases are escaping into the cooling system.
Is it OK to drive with milky oil?
Driving with milky engine oil is not advisable. The presence of moisture in the oil significantly compromises its lubricating properties. This dilution can lead to various issues, including:
- Inadequate Lubrication: Engine components may not receive the protection they need, increasing wear and tear.
- Potential Engine Damage: Continued operation can result in serious engine problems, potentially leading to costly repairs or complete engine failure.
- Overheating: As milky oil clogs vital passages, it can hinder the engine’s ability to dissipate heat, further risking damage.
How do I clean milky oil from my engine?
Cleaning milky oil from your engine involves a systematic approach to ensure thorough removal and restoration of oil quality. Here’s a step-by-step guide:
- Drain Contaminated Oil: Start by removing the drain plug and allowing the old oil to flow out completely. This will remove most of the milky oil.
- Flush the Engine: Use an engine cleaning solution or flush specifically designed for this purpose. Pour it into the engine and run the vehicle for a short period, as recommended by the product instructions.
- Replace the Oil Filter: Once the flush is complete, remove the old oil filter. This step is crucial because it can still contain contaminants.
- Refill with Fresh Oil: After flushing and replacing the filter, refill the engine with high-quality, manufacturer-recommended oil. Ensure that you check the viscosity and type specified in the owner’s manual.
- Address Underlying Issues: Finally, it’s critical to investigate and fix any problems that led to the milky oil formation. If a blown head gasket or another issue is detected, professional repair may be necessary.
What are the potential causes of milky oil?
Milky brown engine oil typically indicates coolant contamination, which can arise from various sources. Understanding these causes is crucial for timely diagnosis and repair. The main culprits include:
- Faulty Head Gasket: This is the most common cause. A compromised head gasket allows coolant to seep into the oil passages.
- Cracked Engine Block or Cylinder Head: These can develop cracks that permit coolant to mix with engine oil, particularly in older or high-mileage vehicles.
- Failed Transmission Cooler: If the cooler is integrated with the engine cooling system, a failure can lead to fluid mixing.
- Condensation: In humid environments or with frequent short trips, condensation can build up in the engine, mixing with the oil and creating milky residue.
How can I prevent milky oil formation?
Preventing milky engine oil is largely about regular maintenance and vigilant monitoring of your vehicle. Here are key strategies to keep in mind:
- Regular Oil Changes: Follow the manufacturer’s recommended schedule for oil changes. Fresh oil is less likely to retain moisture.
- Use Quality Engine Oil: Ensure that you are using oil that meets your engine’s specifications. Quality oils often have better moisture resistance.
- Inspect Cooling System: Regularly check the cooling system for leaks or wear. Address any issues immediately to prevent coolant from entering the oil.
- Monitor Engine Temperature: Keep an eye on the engine temperature gauge. Overheating can indicate a cooling system failure that might lead to milky oil.
- Avoid Short Trips: If possible, combine errands into fewer trips. Short drives don’t allow the engine to reach optimal operating temperature, which can lead to condensation buildup.
What should I do if I find milky oil during an oil change?
Discovering milky oil while changing your oil should prompt immediate action. Here’s what you should do:
- Stop Driving the Vehicle: If you suspect milky oil, it’s best to avoid driving the vehicle until the issue is diagnosed.
- Inspect for External Leaks: Check for any visible coolant leaks around the engine, particularly near the head gasket, coolant hoses, and radiator.
- Consult a Professional Mechanic: It’s advisable to have a qualified technician evaluate your engine. They can conduct pressure tests and other diagnostics to determine the source of the problem.
- Document Findings: Take notes and photographs if possible. This documentation can help the mechanic understand the situation better.
- Consider Engine Flush and Oil Change: After resolving the underlying issue, consider flushing the engine and replacing the oil and filter as part of your maintenance routine.
Is milky oil a sign of a serious problem?
Yes, milky brown engine oil is often a symptom of a significant underlying issue, most commonly related to the engine’s cooling system. It indicates that moisture is entering the oil system, which can lead to:
- Severe Engine Damage: If left unchecked, it can cause internal corrosion, leading to premature engine failure.
- High Repair Costs: The longer the issue persists, the more extensive the repairs may become, increasing overall vehicle maintenance costs.
By understanding these FAQs, vehicle owners can better equip themselves to handle issues related to milky brown engine oil. Regular monitoring, prompt diagnosis, and timely repairs are vital to maintaining engine health and performance. Awareness of symptoms and causes can save time, money, and potential headaches down the road..

Author: Frank Jenkins
Frank Jenkins – Family Car Expert and Safety Advocate
Frank Jenkins, steering you towards safer and smarter family driving. Based in: New York, New York, USA
About Me
Greetings from New York City! I’m Frank Jenkins, your navigator in the world of family vehicles and automotive safety. With over 15 years of experience as an automotive writer and safety consultant, I focus on what matters most to families on the go. Through rigorous testing and detailed research, I ensure that your next family car is not only comfortable and stylish but also packed with the latest safety features.
Contact Information
Topics of Interest
- Family-Friendly Car Reviews
- Vehicle Safety Systems
- Child Passenger Safety
- Road Trip Planning and Car Entertainment
Memberships
More About Frank
Short Bio: Frank Jenkins has become a household name for parents seeking advice on the best and safest cars for their families. His reviews are infused with a parent’s concern and an engineer’s precision. Education: Bachelor of Science in Automotive Technology from the New York University Qualifications: Certified Child Passenger Safety Technician (CPST) Languages: English (Native), French (Intermediate) Previous Roles:
- Safety Feature Columnist for Family Wheels Magazine
- Technical Advisor for Safe Car Campaigns
- Host of “The Safe Family Road Trip” Podcast
Fun Fact: Frank once organized a cross-country road safety workshop, visiting over 50 cities in 30 days.
Interactive Features
- Safety First with Frank: A forum dedicated to discussing and sharing best practices for family road safety.
- Frank’s Philosophy: “The best family memories are made in cars that put safety above everything else.”
- Your Stories: A section for readers to share their family road trip experiences and car-related anecdotes.
Featured Content
Newest Articles:
- “The Ultimate Guide to Family Cars in 2024”
- “Innovations in Car Safety: What Families Need to Know”
Highlighted Content:
- “Minivan or SUV: The Great Family Debate Resolved”
- “Child Seats 101: Choosing the Right One for Your Car”
Recommended Reads:
- “The Road to Safety: How Cars Have Become Safer for Children”
- “Entertaining Your Kids on the Road: Tips and Tricks”
Multimedia Spotlight:
- Podcast: “Drive Time Family” – Discussions on making family travel safer and more enjoyable
- Video Series: “Car Seat Clinics” – Demonstrations on proper car seat installation and usage
Editorial Team & Collaborations
Frequent Co-authors:
- Emily Chen, Urban Driving Specialist
- Marcus O’Reilly, Off-Road Adventure Guru
Editorial Staff Overview: A team of dedicated writers and safety experts committed to helping families make informed decisions about their vehicles. Editorial Guidelines: We are steadfast in providing transparent and practical advice that prioritizes the well-being of all passengers.
Journey With Me
For reliable reviews, safety advice, and the best in family automotive, hit the road with Frank Jenkins at oilforcar.com

Pingback: How to Jump Start a Car with Jumper Cables - Explore Oil For Car -Motor Oil Maintenance and Car Tips
Pingback: How Cold Temperatures Affect Engine Oil: Essential Tips for Winter Driving - Oil for Car – Car Oil Reviews, Guides, & Car Tips
Pingback: Recognizing the Signs of a Failing Car Battery: A Complete Guide to Avoiding Unexpected Breakdowns - Oil for Car – Car Oil Reviews, Guides, & Car Tips
Pingback: Understanding the Difference Between API CK-4 and FA-4 Engine Oils - Oil for Car – Car Oil Reviews, Guides, & Car Tips